|
Smart Audio Monitor |
Voice-Activated Monitoring Application
for Home and Commercial Use
User Manual
Version 1.0
02/03/04
Copyright (C) 2004
All rights reserved
Kenneth Delahoussaye
web: www.kadtronix.com
email: info@kadtronix.com
Table of Contents
-
Introduction
-
System Requirements
-
Features
-
Ordering
-
Installation
-
Program Operation
-
Activation
-
Menu Selections
-
Audio Monitor
-
Recorder
-
Player
-
Settings
-
Configure Action
-
Configure Input and Output
Audio
-
Configure Noise Detection
-
Configure Sensitivity
-
Save Settings
-
Credits
-
Legal
-
License
-
Warranty
-
Introduction
The Smart Audio Monitor (SAM) is a multi-purpose audio monitoring
tool designed to automatically capture and record sounds in a given environment.
The application contains 3 major functions: audio monitor, recorder,
and player. The audio monitor function "listens" for voices
and other noises by continually monitoring audio levels. You may
specify the desired audio trigger level at which an action is to occur.
Indicate one of the following actions:
-
Record audio to hard disk
-
Play a sound (.wav) file
|
Follow-on versions of the application may additionally include the following
action capabilities:
-
Send an e-mail
-
Set a digital output
-
Send a SPI command
-
Run a user-specified PC application
|
When the audio trigger level is exceeded, the recorder function
is automatically activated for a pre-specified time period. The recorder
stores audio to file(s) on the hard disk for later playback by the player
function. Alternatively, instead of recording to file, SAM can play
a pre-recorded sound (.wav) file. This may be particularly useful
in situations when you wish your audience to know that they are being noisy
and need to settle down. (Perfect for the parent, teacher, or presenter
who needs to leave the room for a few moments and want to maintain a quiet
environment in their absence.) Whether in the home, school, office,
etc., SAM has a variety of possible uses and is ideally suited for any
application where autonomous audio monitoring is required:
-
Security
-
Research
-
Education
-
Robotics
-
Industrial Control
-
Noise Control
|
-
System Requirements
The Smart Audio Monitor requires a Windows laptop or desktop PC with
the following minimum capabilities:
-
Pentium CPU
-
1 MB RAM
-
1 MB Available Hard Disk Space
-
VGA Monitor
-
Sound-card
-
Microphone
-
Speakers
-
Windows 95/98/2000/XP
Features
SAM features include the following:
Voice-activated monitoring
Adjustable audio "trigger" level
Graphical interface including LED indicators, bar-graphs, and related controls
3 major functions including: audio monitor, recorder, and player
Configurable sensitivity and sound detection
Selectable trigger action: record to file or play .wav file
Configurable noise detection setting prevents "triggering" on incidental
noises
Adjustable sensitivity to detect voices at a distance.
Selectable recording duration and number of recordings to perform
Timer displays elapsed recording time
Ordering
SAM is available at the following source:
Kenneth Delahoussaye
web: http://www.kadtronix.com
email: sales@kadtronix.com
Installation
Before installing the application, be sure to uninstall any earlier
version(s). To start the installation process, locate and run
the self-extracting setup file (setup.exe) on the install media.
Program Operation
-
Activation
Activate the program by selecting:
Start Menu -> Programs -> Smart Audio Monitor
When the program begins, the main display dialog appears as shown below:
Menu Selections
You may obtain help at any time using the following menu selection:
Help -> Contents...
This opens a separate dialog window containing application
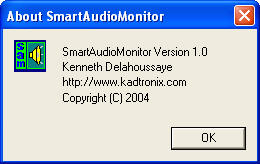
descriptions and how-to information. You may also view summary information
about the application including how to contact the program creator for
registration and/or help issues:
Help -> About...
To view and/or change configuration settings, use the following menu
selection:
File -> Settings...
This selection activates a page containing configuration and adjustments
items. (Refer to the Settings section for
an explanation of these adjustments in detail.) To exit the
application, select:
File -> Exit
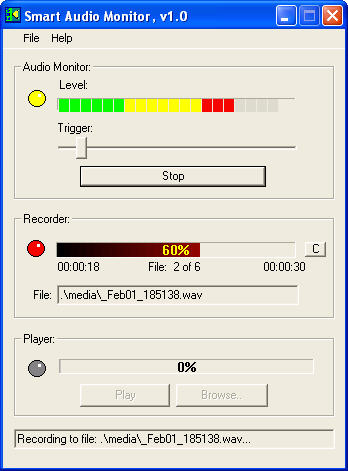
There are 3 graphical function areas: Audio Monitor, Recorder,
and Player. Any graphical controls not currently in use remain "grayed"
or disabled until the function is activated.
-
Audio Monitor
The audio monitor contains a slider that selects the desired audio
trigger level. Move the slider to the left to capture low-intensity
sound levels. Move to the right for louder, higher intensity captures.
(Also refer to the Settings section for additional
adjustments.) The audio monitor also contains a bar-graph audio meter
indicating current audio levels. To start the audio monitor, click
the button labelled "Start Monitoring".

Once activated, the yellow LED indicator turns on and the audio meter
becomes active. If sound levels exceed the trigger level indicated
by the slider control, then recording will begin. (Refer to the Recorder
and Settings sections for details.)

To stop the audio monitor and any recording in progress, click the "Stop"
button.
-
Recorder
The recorder automatically records and stores audio to the
hard disk when the audio monitor detects levels
which exceed the specified trigger level. When there is no activity,
all controls are grayed and/or disabled as shown below:

When the recorder activates, the red LED indicator becomes active.
The progress bar begins to increase from left to right as the recording
continues. Once the specified duration has been reached, the recording
stops and the audio monitor awaits another detection.

Under the progress bar are several items of information. The timer
field to the left (00:00:18) shows how much of the current file has been
recorded thus far. The timer field at the right (00:00:30) shows the maximum
duration of the file. This parameter is specified in the Settings
section. The field shown in the middle of thie display (File:
2 of 6) is the file-counter and indicates the number of files which have
been recorded out of the maximum desired. (If the file-counter
reaches the maximum, no further recordings will occur.) This parameter
is also specified in the Settings section.
The "File:" field at the bottom indicates the file name being recorded.
The file names are derived from a time and date stamp as shown below:
_MMMdd_hhmmss.wav
The designations have the following meanings:
MMM = 3-character month abbreviation (e.g., "Feb")
dd = 2-digit day of the month (01 to 31)
hh = 2-digit hour (00 to 23)
mm= 2-digit minute (00 to 59)
ss = 2-digit second (00 to 59)
wav = file extension indicating an audio wave file
-
Player
The audio player allows you to play any previously recorded file.
Initially, the player is inactive and all graphical controls are grayed
and/or disabled as shown:

There are two button selections for playing a file. Use the "Play"
button to play the last recorded (i.e., most recent) file. Use the
"Browse..." button to choose a different file. Then click "Play"
to play this selection.
When the player activates, the green LED indicator becomes active.
The progress bar begins to increase from left to right as the file is played.
When the entire file has completed, the player stops and returns to its
inactive state.

Settings
Use the following menu selection to view the "Settings" page:
File -> Settings...
This page contains a number of configurable parameters as shown
below:

-
Action
The action region allows you to specify the action to take when
the audio level exceeds the trigger value. If you wish to capture
recorded audio to the hard disk, click the "Record" check box. Specify
the maximum number of files to record and the duration of each. (These
settings are useful for conserving disk space.) If, instead, you
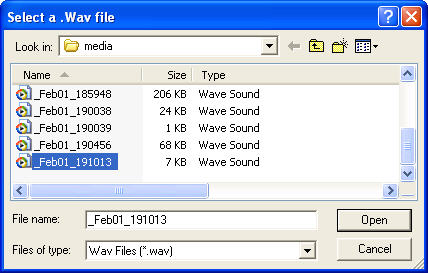
desire to play a sound (.wav) file when the trigger level is exceeded,
click the "Play Sound File" check box. Use the "Browse" button to
specify the file. Use the "Preview" button to listen to the sound.
Once configured, the selected .wav file will play each time the trigger
occurs.

-
Configure Input and Output
Audio
These sections allow you to configure microphone input and speaker
output.
To view microphone properties, click the "Input..." button. A
display will appear resembling the following:
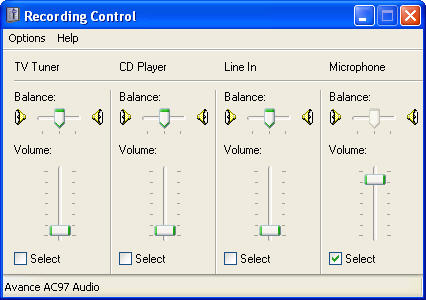
Make sure the microphone is selected as shown above. Also ensure
that its volume level slider is in the middle to upper portion of its range.
You will also need to adjust the speaker level for playing
recorded audio or if you have selected
Play
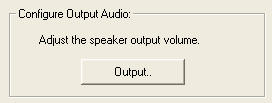
Sound File for triggering purposes. To adjust the speaker output
volume, click the "Output..." button.
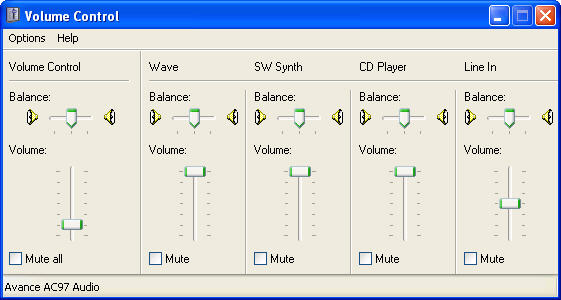
Adjust the "Volume Control" slider to the desired level and ensure it
is not muted.
-
Configure Noise Detection
Use this adjustment to help filter incidental, short-duration
sounds which should not be captured. Raise the slider level to ignore
short-duration sounds. Lower it to detect these sounds.
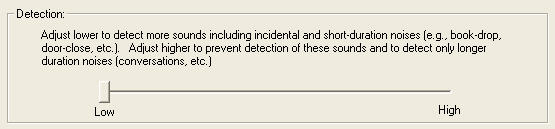
Note: For proper audio triggering. you should configure
noise
detection and
sensitivity.
You may find it necessary to make several adjustments over time before
attaining the right detection level for your environment.
-
Configure Sensitivity
Use this adjustment to modify input sensitivity. Adjust higher
if the microphone is far from the sound source. Adjust lower otherwise.
(Before adjusting sensitivity, you should first configure
the input.)
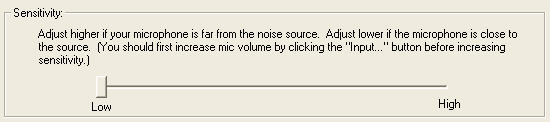
Note: For proper audio triggering. you should configure noise
detection and
sensitivity.
You may find it necessary to make several adjustments over time before
attaining the right detection level for your situation.
-
Save Settings
When you have completed settings adjustments, click "OK" to store the
settings and close the display. If you decide not to store your settings,
click "Cancel". The dialog window will be closed and you will be
returned to the main display.
-
Credits
Special thanks to the following individuals for their creative contributions
to this application:
Ernest Laurentin
Matt Weagle
-
Legal
By purchasing this product, you, the customer agree to terms of
licensing and warranty. Please read the following sections carefully.
-
License
As the registered user of this software, you are granted the right
to use one copy of the application software on a single computer. The user
may not use the application on more than one computer at the same time.
(Exceptions are allowed for teachers who may run individual copies of the
program on each computer in their classroom.) The application may
NOT be otherwise copied, distributed, or re-sold without express written
permission.
-
Warranty
THE AUTHOR DISCLAIMS ALL WARRANTIES RELATING TO THIS PRODUCT, WHETHER
EXPRESSED OR IMPLIED, INCLUDING BUT NOT LIMITED TO ANY IMPLIED WARRANTIES
OF MERCHANTABILITY AND FITNESS FOR A PARTICULAR PURPOSE, AND ALL SUCH WARRANTIES
ARE EXPRESSLY AND SPECIFICALLY DISCLAIMED. NEITHER THE AUTHOR, NOR ANYONE
ELSE WHO HAS BEEN INVOLVED IN THE CREATION, PRODUCTION, OR DELIVERY OF
THIS PRODUCT SHALL BE LIABLE FOR ANY INDIRECT, CONSEQUENTIAL, OR INCIDENTAL
DAMAGES ARISING OUT OF THE USE OR INABILITY TO USE SUCH PRODUCT EVEN IF
THE AUTHOR HAS BEEN ADVISED OF THE POSSIBILITY OF SUCH DAMAGES OR CLAIMS.
IN NO EVENT SHALL THE AUTHOR'S LIABILITY FOR ANY SUCH DAMAGES EVER EXCEED
THE PRICE PAID FOR THE PRODUCT, REGARDLESS OF THE FORM OF THE CLAIM. THE
PERSON USING THE PRODUCT BEARS ALL RISK AS TO THE QUALITY AND PERFORMANCE
OF THE PRODUCT.